Introduction
Connect Tech TX1 carrier boards offer several ways of remote connection to the device. These methods will allow you to access the terminal interface via network access over SSH, or direct connection to the serial connector on the carrier.
Disclaimer
There are two different serial protocols used on the TX1 carriers provided by Connect Tech, and this varies from carrier to carrier. The following table will inform you on which serial type is in use on each carrier.
| Carrier | Serial Type | Voltage | Ports (Pins) | Serial Console |
|---|---|---|---|---|
| ASG001/ASG004 | RS232/422/485 | +/-5.5v | RS232 0 – I/O Tx 1 Rx 2 1 – I/O Tx 7 Rx 8 RS485/RS422 0 – I/O Tx +1/-3 Rx +2/-4 1 – I/O Tx +7/-9 Rx +8/-10 | Port 1 |
| ASG002 | RS232/485 | +/-5.5v | RS232 0 – I/O Tx 1 Rx 2 1 – I/O Tx 7 Rx 8 RS485 0 – I/O Tx +1/-3 Rx +2/-4 1 – I/O Tx +7/-9 Rx +8/-10 | Port 0 |
| ASG003 | TTL | 3.3v | TTL 0 – I/O Tx 3 Rx 4 1 – I/O Tx 5 Rx 6 | Port 0 |
| ASG005/ESG503 | RS232 | +/-5.5v | RS232 0 – I/O Tx 12 Rx 11 1 – I/O Tx 10 Rx 9 | Port 0 |
| ASG006 | TTL | 3.3v | TTL 0 – I/O Tx 2 Rx 4 RTS 6 CTS 8 1 – I/O Tx 12 Rx 14 RTS 16 CTS 18 | Port 0 |
| ASG007 | RS232 | +/-5.5v | RS232 P7(GPIO/Serial/I2C) 0 – Tx 12 Rx 10 P8(Serial) 1 – Tx 5 Rx 3 | RTS 4 CTS 6 | Port 0 |
| ASG008 | TTL | 3.3v | TTL 0 – I/O Tx 3 Rx 4 1 – I/O Tx 1 Rx 2 | Port 0 |
Setup
The setup process for remote connection is done through a virtual terminal when using the carrier’s serial interface or via the network over SSH, as such it is important to remember that some devices such as display adapters will not be available over these interfaces. When connecting to your device remotely you will require an additional computer terminal that is capable of the following remote setups. The serial debug is always assigned to the dev/ttyS0, you may enable/disable or change the port by editing /etc/init/ttyS0.conf.
On Windows, you may use Putty for both direct serial communication via a COM port interface or remote network SSH communication.
https://the.earth.li/~sgtatham/putty/0.69/htmldoc/
On Linux, you may use picocom to perform direct serial communication via a COM port interface. You may use the ssh command to use SSH network communication.
https://linux.die.net/man/8/picocom
http://linuxcommand.org/man_pages/ssh1.html
Serial
When starting Putty you will be introduced with a configuration window.
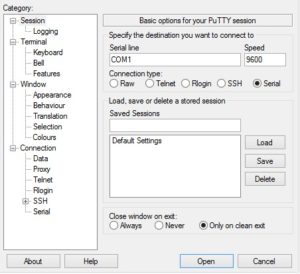
Select the Serial under the Connection type options, the window will change with a Serial line dialog box and speed dialog box. You will need to know at which COM interface your TX1 is located. You may find this under device manager. When you have found your COM device, fill in the dialog box and ensure that the Speed (Baud) is set to 115200. When finished, click the Open button located at the bottom of the window – this will start your serial interface terminal in a new window.
In Linux, you may use picocom or any available serial software. When using picocom ensure you have the correct serial device selected on your Host Linux system. You may find available serial devices under /dev/ directory and set the device to a baud rate of 115200 in picocom, like so:
picocom -b 115200 /dev/ttyX
This will start your serial interface with your TX1. You may now turn on your TX1 device and your serial terminal will populate with the TX1 startup logs. When the logs have finished, you will be greeted with a user login and password.
Login: tegra
Password: ubuntu
SSH
You may SSH into your device if it is connected to your local network, this may require you to plug in the Ethernet on your device to your router or by setting up WiFi. If you wish to use WiFi, you will be required to boot up your device either into the live desktop or connect over serial if there is no display. To setup wireless via the terminal you will need to add the following to have the TX1 always connect to a preferred SSID:
Add your router’s broadcasting SSID and password to wpa.conf using this command
iwlist scan
sudo nmcli dev wifi connect <YOUR_SSID_HERE> password <YOUR_KEY_HERE>
Now attempt to ping an internet address such as https://connecttech.com or a local IP address on your network.
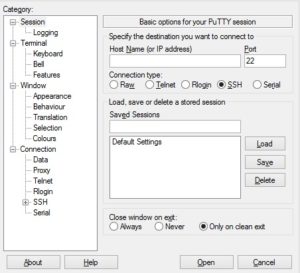
When using Putty, select SSH under the Connection Type options, you should then see Host Name (or IP address) and Port dialog boxes. You will need to determine to what the local IP address of the TX1 is assigned on your router. You may find this by pinging your local address at for example XXX.XXX.X.255 which will perform a broadcast on your network, then type arp –a in CMD terminal. You may then reference the Physical address (MAC) of the TX1 to find your devices IP address.
On Linux, you must broadcast on your network as described in the Windows Putty example. When using SSH you may simply type the following command into your terminal:
ssh ubuntu@<DEVICE_IP_ADDRESS>
or
ssh ubuntu@tegra-ubuntu
You will likely be prompt to enter the device password which by default is ubuntu.
VNC
You may also run a VNC which allows the use of remote viewing of the Ubuntu desktop on the TX1 system. As this service is not active by default, you may use the Desktop Sharing application in the GUI. This will allow you to access your TX1 network connection. If you have not setup WiFi, please refer to the SSH section for setup.

A VNC service can also be setup via the command line interface – you will require x11vnc. The setup process is as follows:
Setup password in x11vnc. This will prompt to type a password which will be saved to ~/.vnc/passwd (Your keystrokes will not be echoed)
x11vnc -storepasswd
To have x11vnc start at boot use the following command:
/usr/bin/x11vnc -forever -rfbport 5900 -rfbauth /etc/x11vnc.pass -auth guess -display :0 -bg -shared -noxdamage -xrandr
To do this you will require a VNC client for your remote PC. When you have acquired a VNC client that you prefer, you may setup the client using the TX1 IP and the password that was set in your x11vnc.