Introduction
The CTI-L4T Board Support Package adds support for Connect Tech NVIDIA® Jetson™ Xavier/TX2/TX1 carrier boards to Linux4Tegra. It includes any extra files required to use all the features of the carriers. Please check the “Product Specific Details” section for what features for your board are currently supported with the current BSP release and the “Change Log” section for the changes made between versions in our release notes here.
Prior to installing the BSP please read this entire KDB.
These instructions are valid for JetPack 4.3 and previous. JetPack and onwards can be viewed here.
The latest versions of CTI-L4T can be downloaded from here.
AGX Xavier
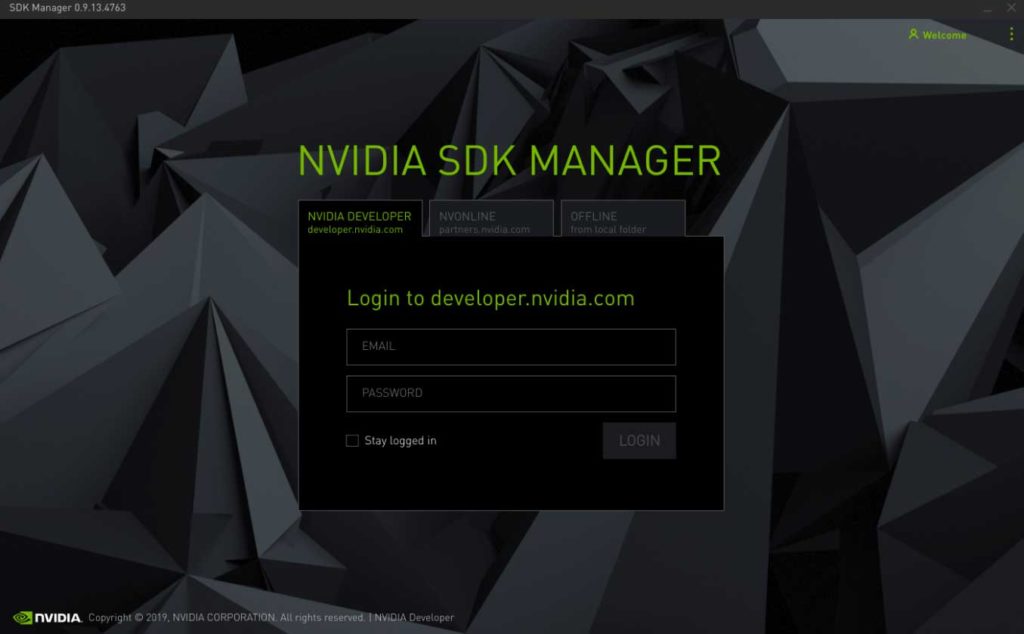
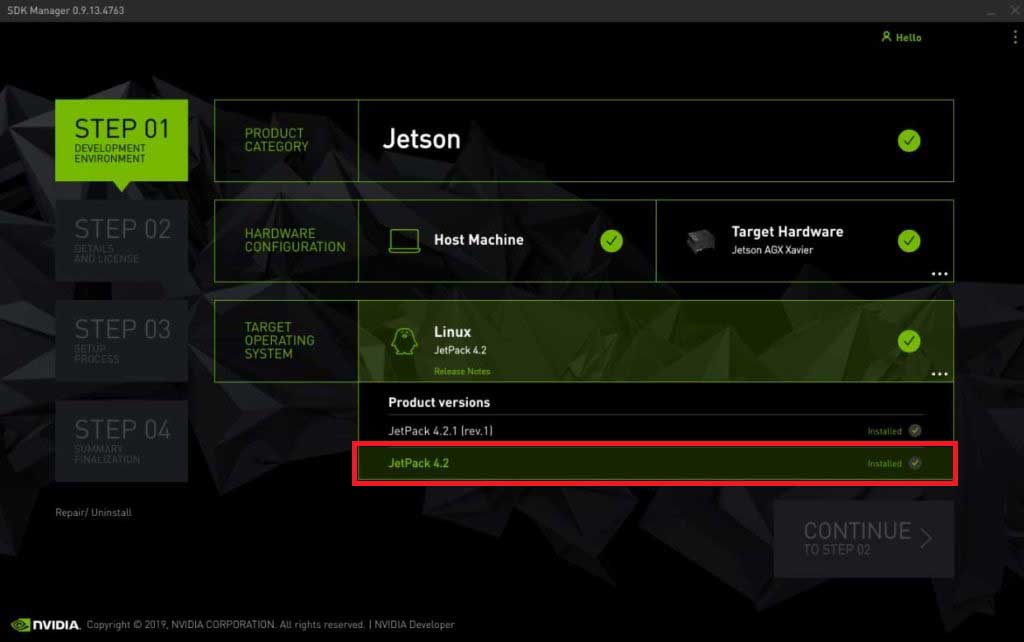
1. Open NVIDIA SDK Manager. For first time use, you must log in to your NVIDIA Developer account.

2. Choose your target Operating System to be JetPack 4.2.1
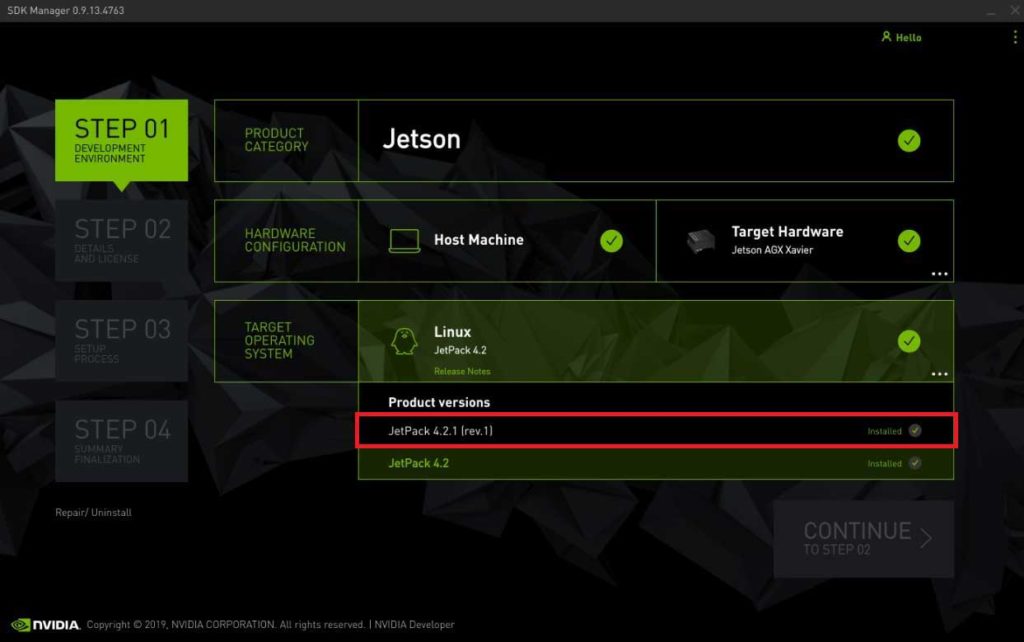
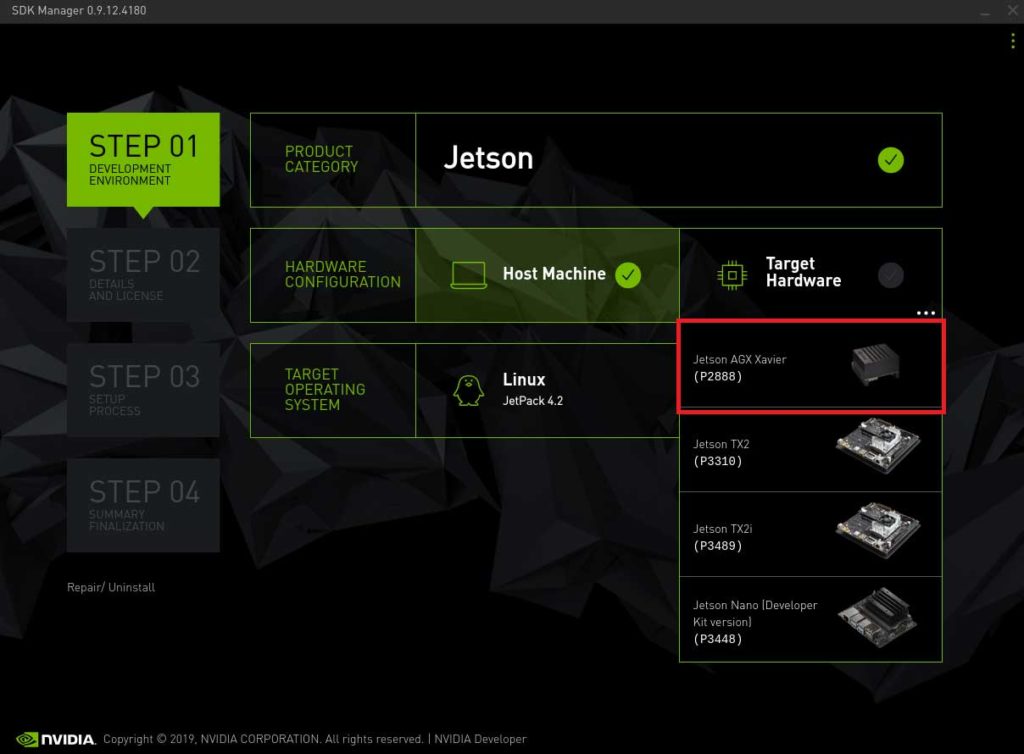
3. Choose your target hardware to be the AGX Xavier

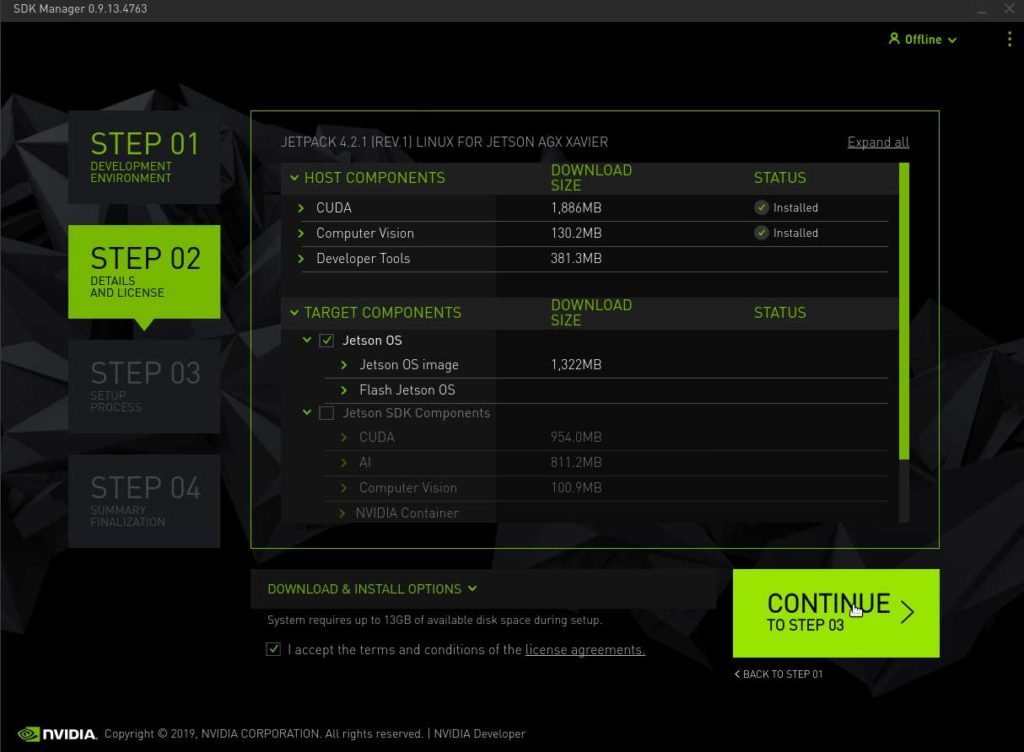
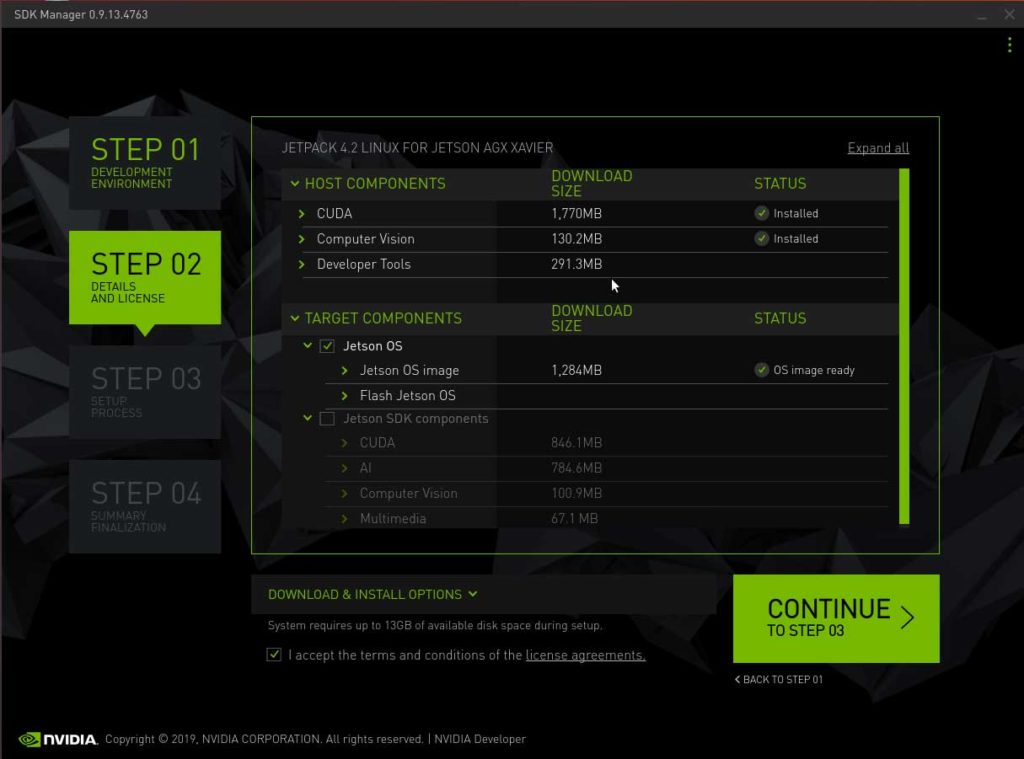
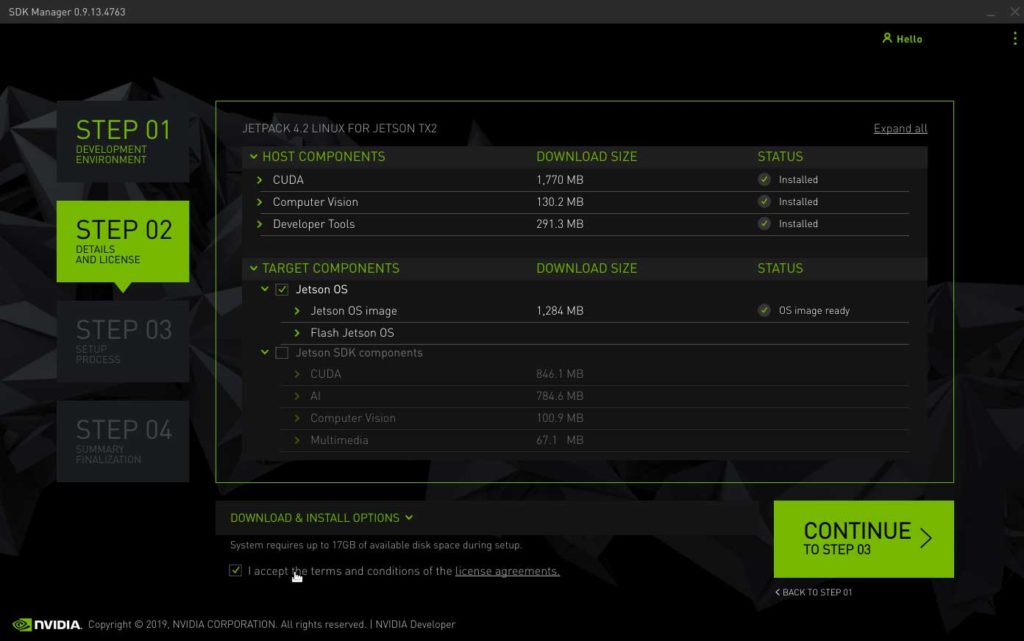
4. You may uncheck the box for SDK components if you do not need CUDA applications etc. Accept the terms and continue to STEP 03.
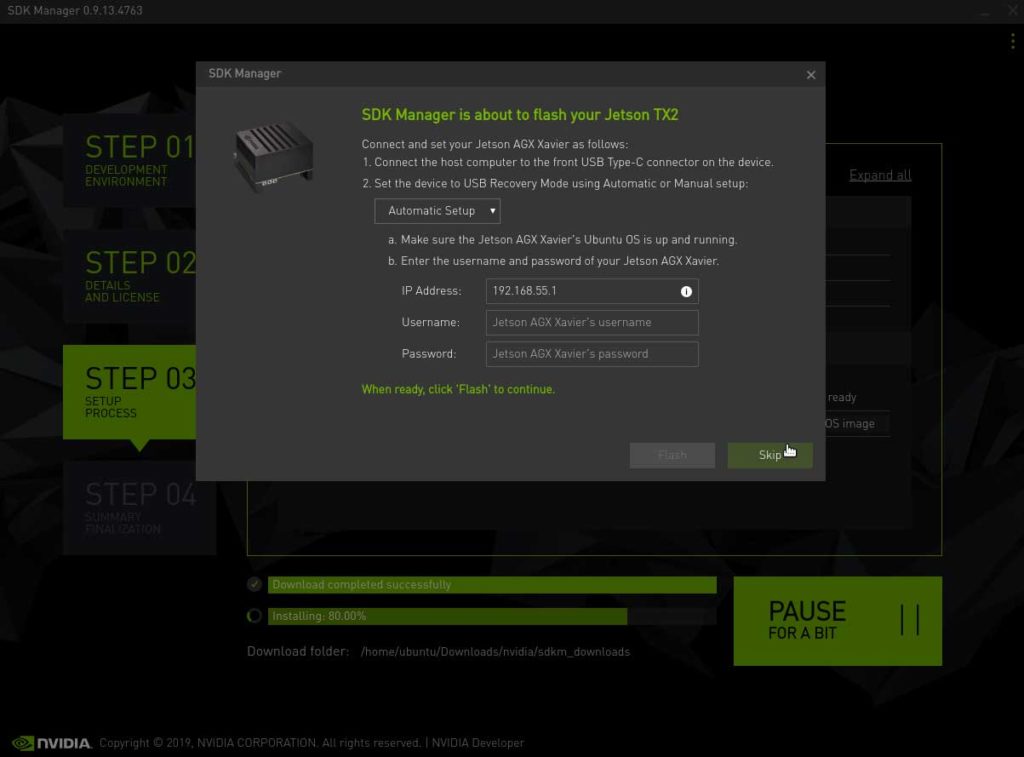
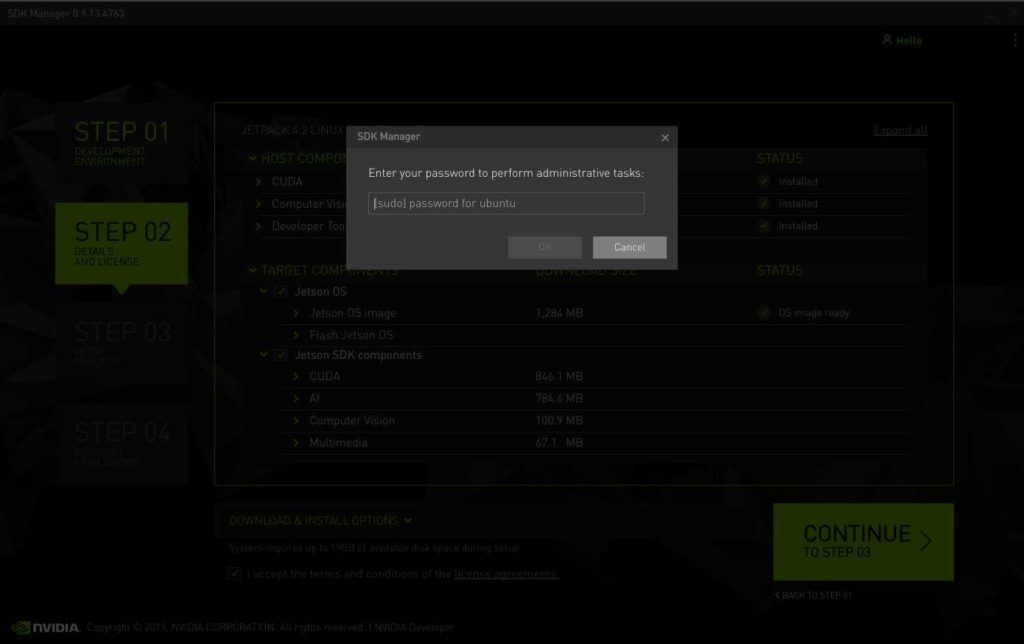
5. Enter your password to perform administrative tasks.

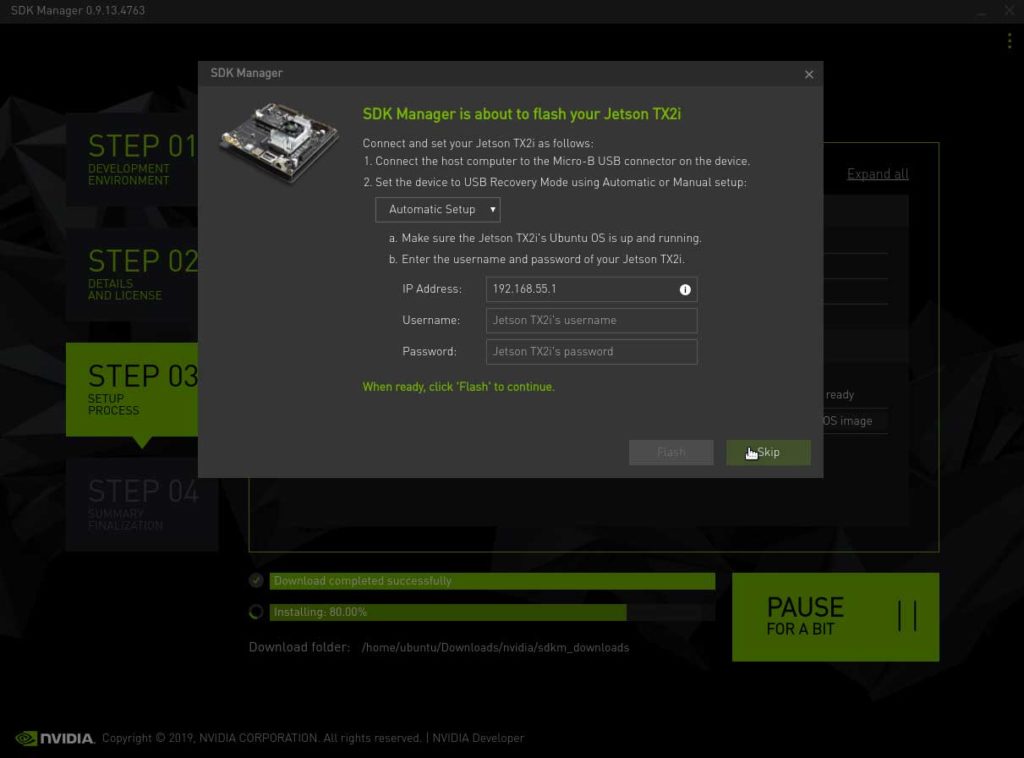
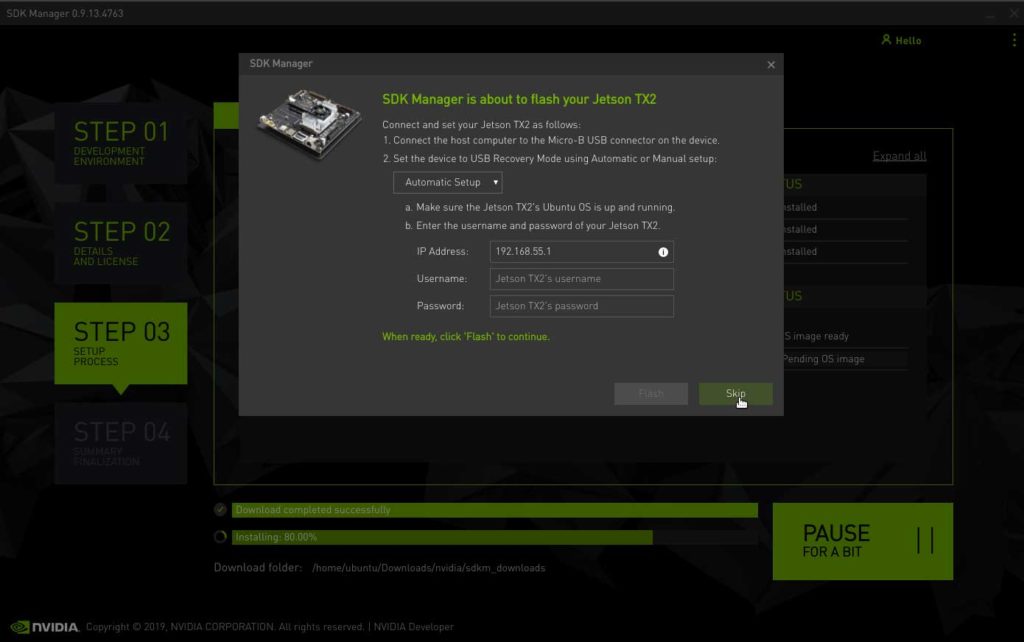
6. Click to Skip flashing the Jetson Xavier with the SDK Manager, as this is done at a later time.
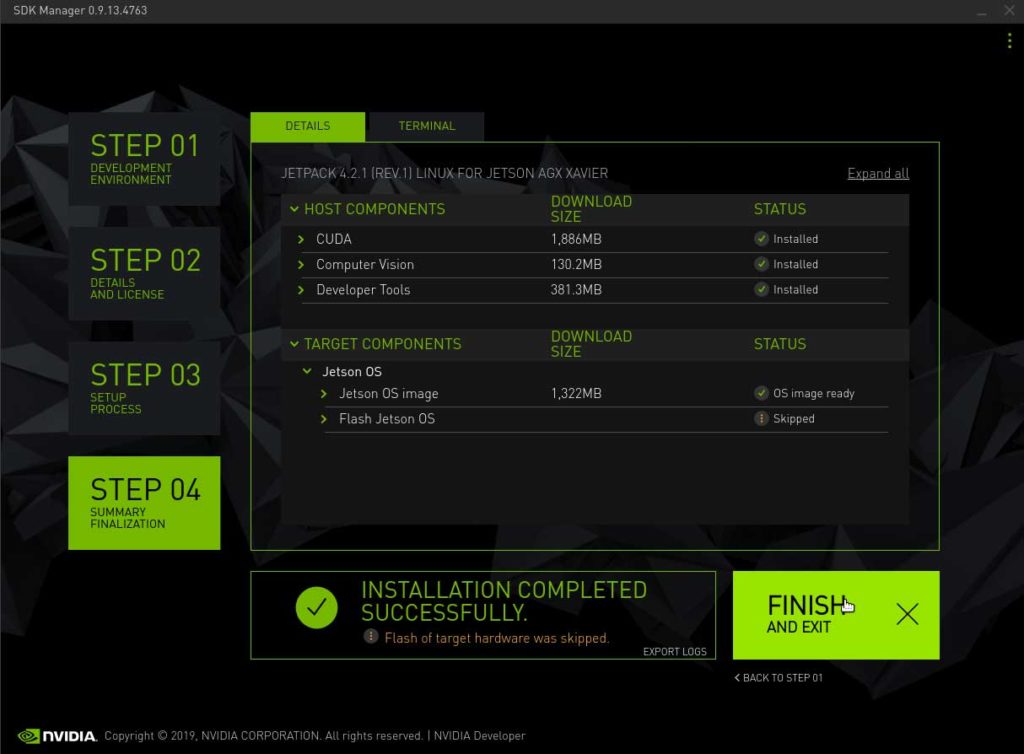
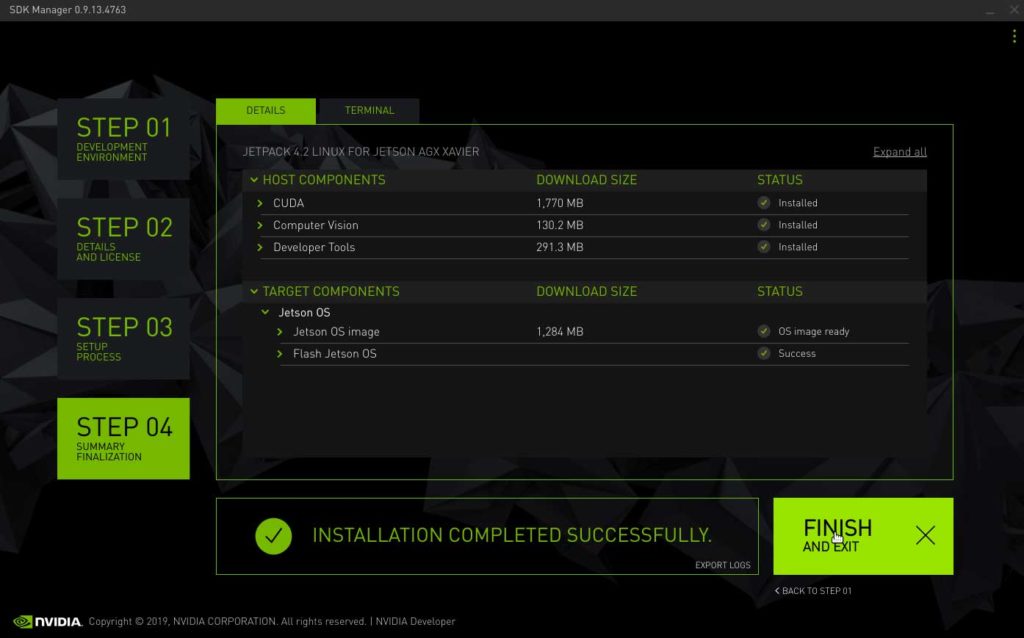
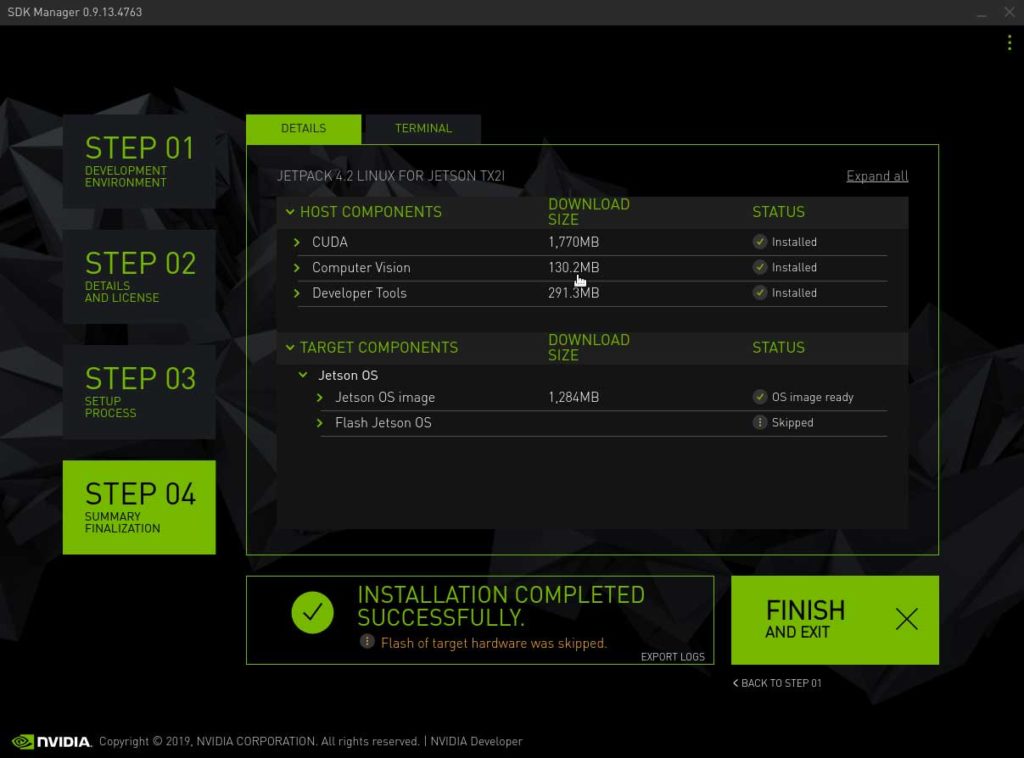
7. Once the setup process from STEP 03 is finished, review the summary finalization in STEP 04 and click ‘FINISH AND EXIT’.
L4T r32.2.0
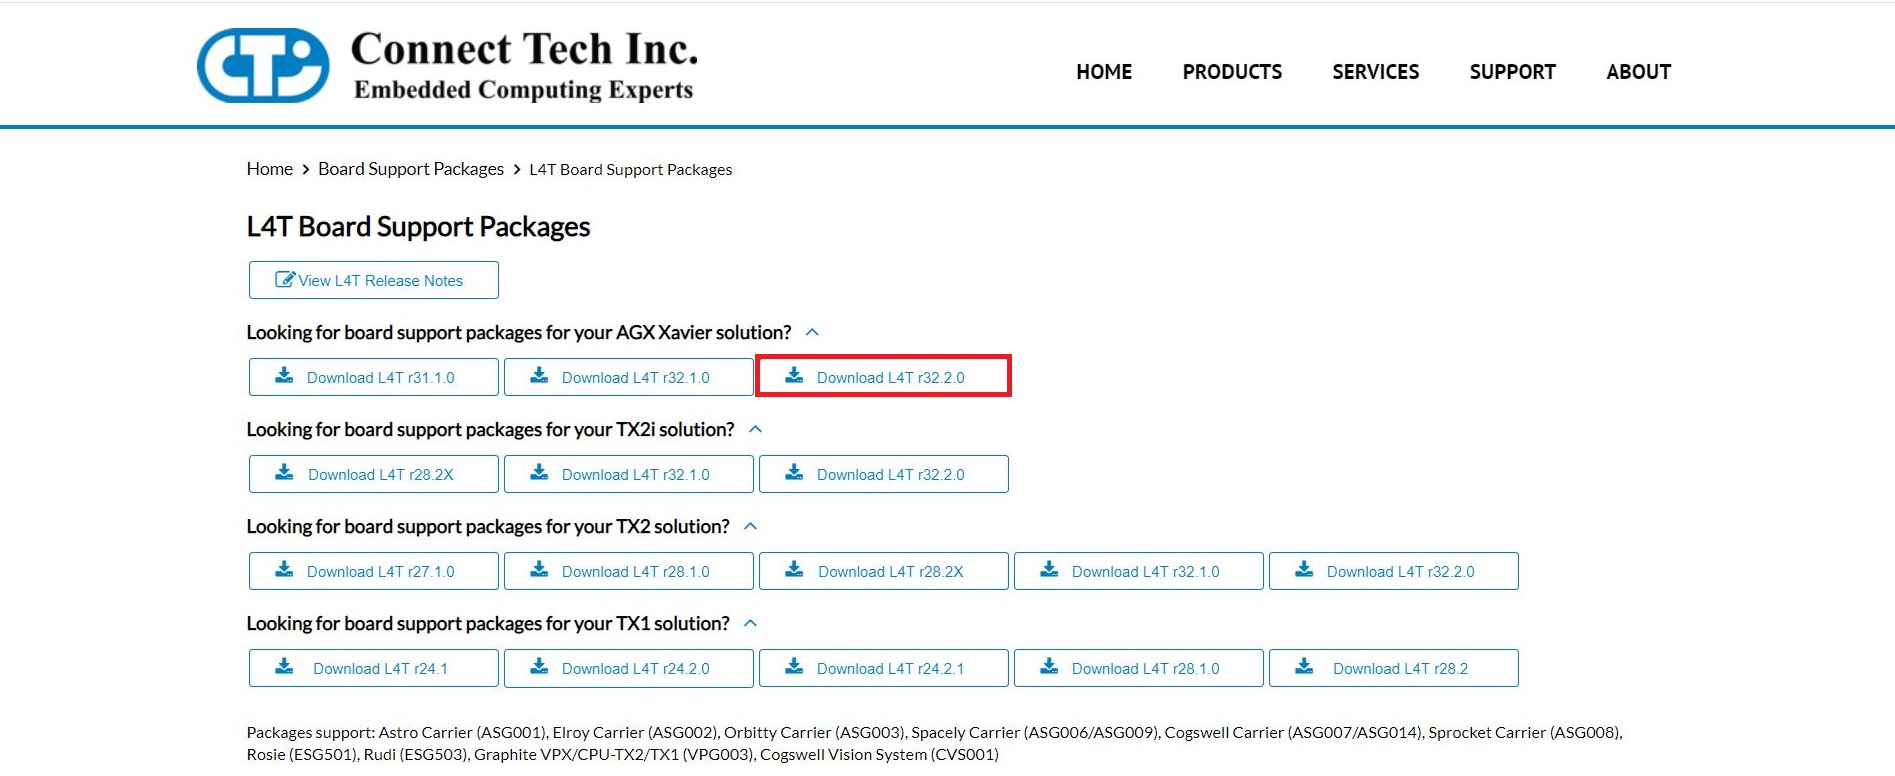
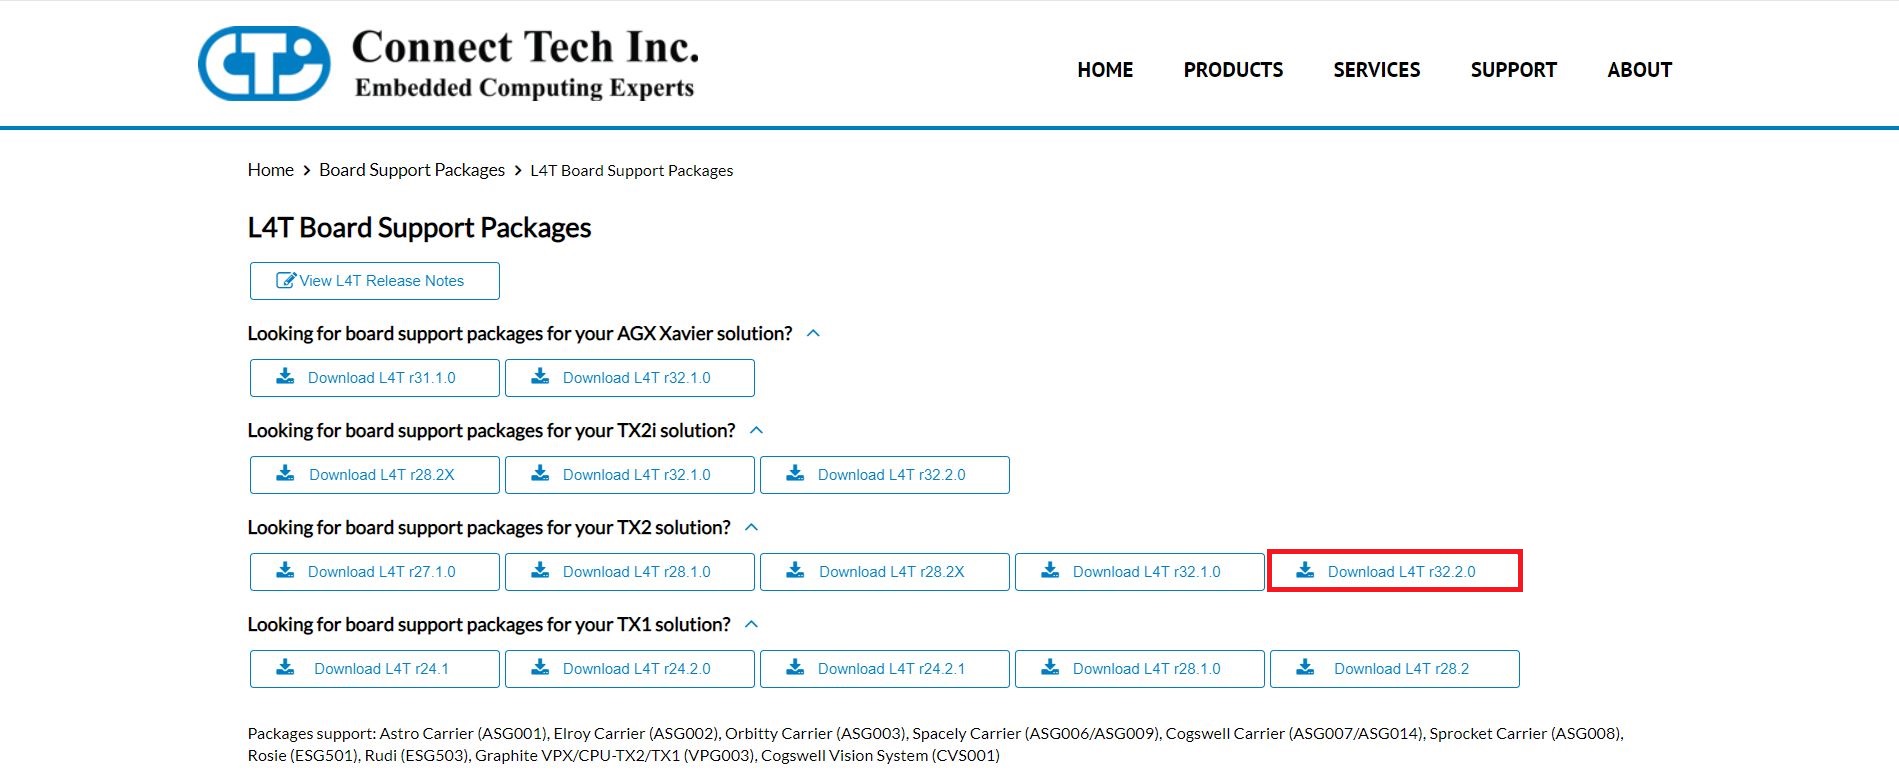
The CTI-L4T Board Support Package adds support for Connect Tech NVIDIA® Jetson™ Xavier and TX2i/TX2/TX1 carrier boards to Linux4Tegra. It includes any extra files required to use all the features of the carriers. You can click here to download the L4T Board Support Packages from our website. We provide board support packages for your AGX Xavier solutions and TX2i/ TX2/ TX1 solutions.
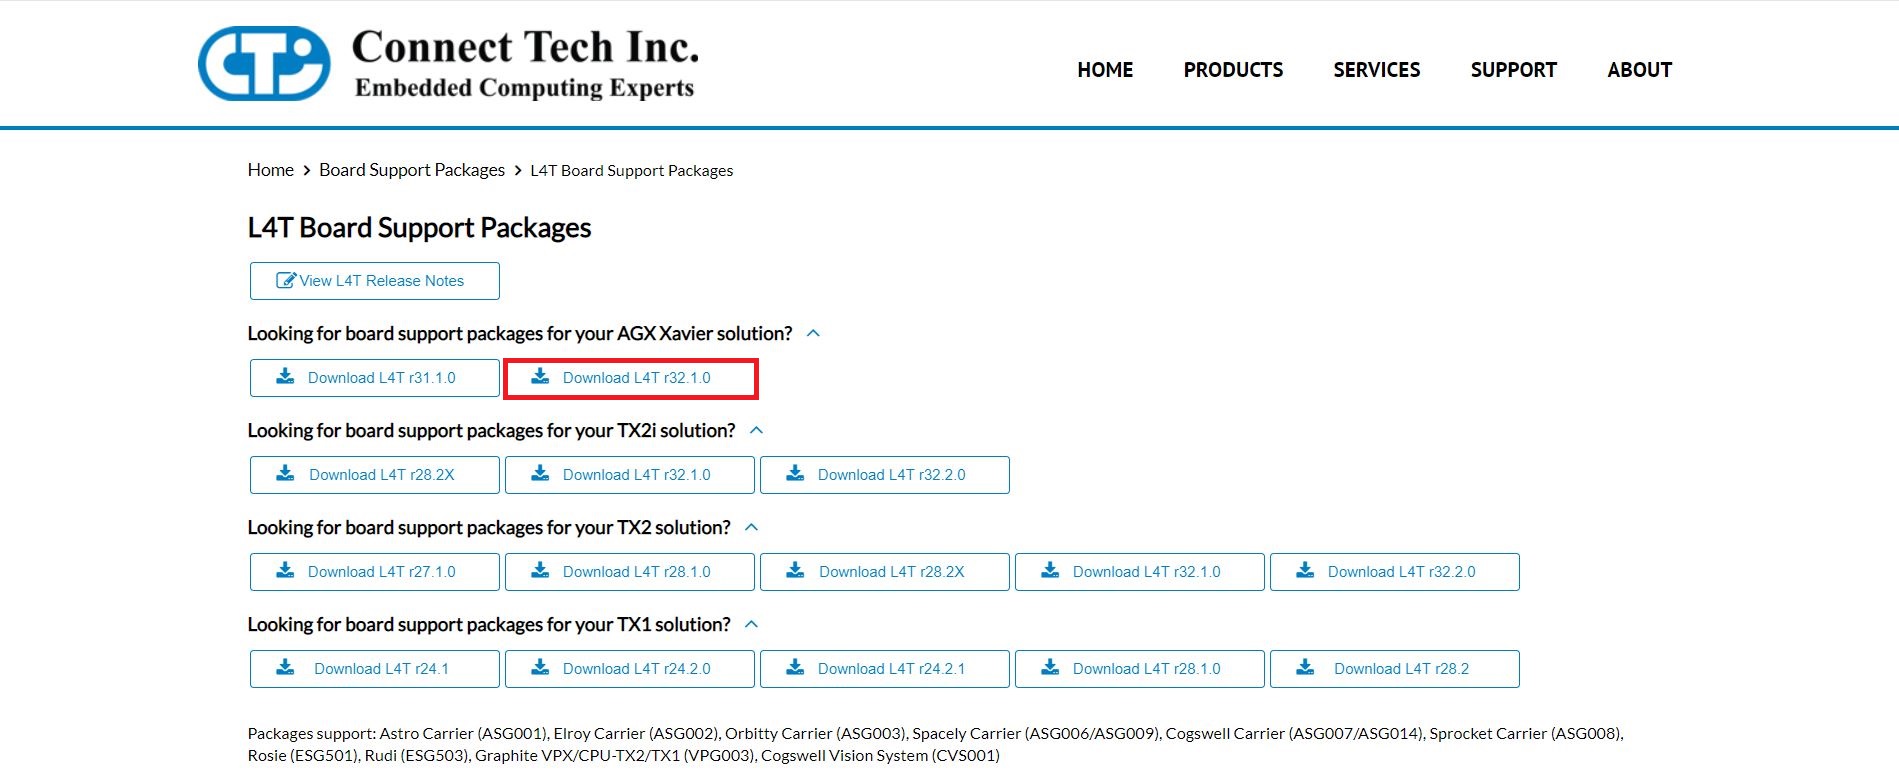
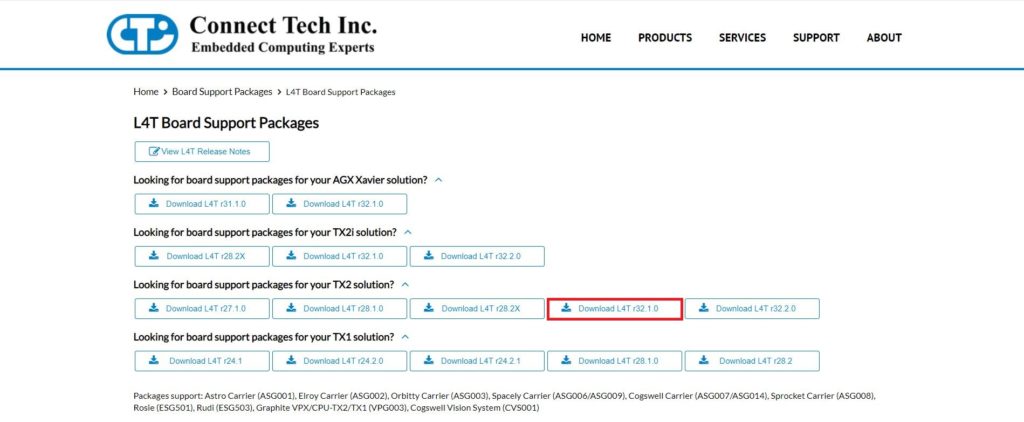
1. Click to download the Board Support Package and choose the appropriate L4T package for your Jetson AGX Xavier.
2. Once you download your board support package, copy the downloaded CTI BSP into the ‘Linux_for_Tegra’ directory as shown in the terminal screenshot.
cp Downloads/CTI-L4T-V204.tgz ~/nvidia/nvidia_sdk/JetPack_4.2.1_Linux_GA_P2888/Linux_for_Tegra/
cd nvidia/nvidia_sdk/JetPack_4.2.1_Linux_GA_P2888/Linux_for_Tegra/
3. Afterwards, extract the .tgz file to unload the CTI product profiles for flashing. Log in as root user using ‘sudo’ where you will be asked the the password for Ubuntu and run the install script to automatically install the board support package files to the correct locations on the host system.
tar -xzf CTI-L4T-V204.tgz
cd CTI-L4T
sudo install.sh
4. Before installing the board support package, please read the included readme.txt. To switch between different products, the module will need to be re-flashed. Supported CTI product profiles will be listed when running the install.sh file. Once done, change back into the ‘Linux_for_Tegra’ directory . Now you can flash your Xavier using the NVIDIA Development kit or CTI carrier.
cd ..
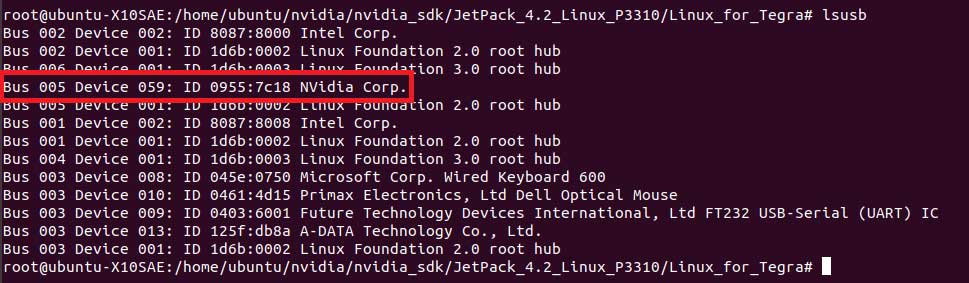
5. Hold the recover button on the NVIDIA Development kit or CTI carrier, then press the power button. Connect a USB OTG cable from the NVIDIA Development kit or CTI carrier to the host computer. Type ‘lsusb’ to confirm the device is in recovery.
6. You may run an automatic flash script called the cti-flash.sh
./cti-flash.sh
Or you may manually flash the module with the correct profile for your your CTI carrier.
The profiles end with ‘.conf’. when flashing the board do not type the ‘.conf’ extension.
./flash.sh cti/xavier/<CTI Carrier Profile> mmcblk0p1
Here is a Table illustrating the different CTI Carrier profiles that can be flashed on the AGX Xavier.
| Sentry-X | Rogue | Mimic | |
|---|---|---|---|
| Xavier | sentry-dp sentry-hdmi | rogue rogue-gmsl rogue-imx274-2cam | mimic-base mimic-spacely-base |
7. Once you read the flash is successful prompt, the power can be cycled and the Jetson AGX Xavier can be booted from its internal memory.
If flashed correctly, you should receive an output stating:
*** The target t186ref has been flashed successfully. ***
1. Open Nvidia SDK Manager. For first time use, you must log in to your Nvidia Developer account.
2. Choose your target Operating System to be JetPack 4.2
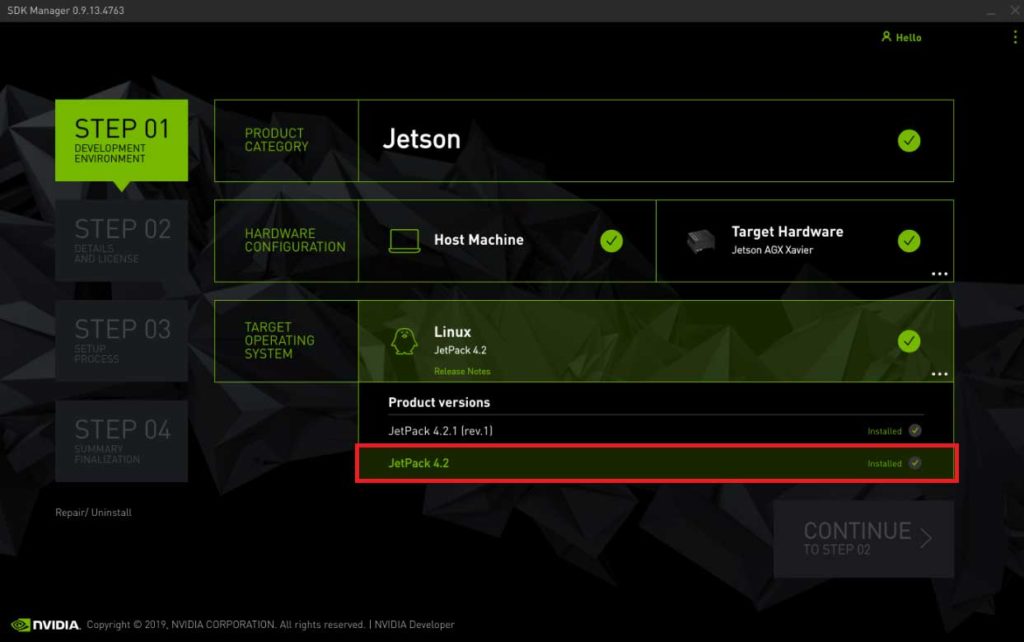
3. Choose your target hardware to be the AGX Xavier
4. You may uncheck the box for SDK components if you do not need CUDA applications etc. Accept the terms and continue to STEP 03.
5. Enter your password to perform administrative tasks.

6. Click to Skip flashing the Jetson Xavier with the SDK Manager, as this is done at a later time.

7. Once the setup process from STEP 03 is finished, review the summary finalization in STEP 04 and click ‘FINISH AND EXIT’.
L4T r32.1.0
The CTI-L4T Board Support Package adds support for Connect Tech NVIDIA® Jetson™ Xavier/TX2/TX1 carrier boards to Linux4Tegra. It includes any extra files required to use all the features of the carriers. You can click here to download the L4T Board Support Packages from our website. We provide board support packages for your AGX Xavier solutions and TX2i/ TX2/ TX1 solutions.
1. Click to download the Board Support Package and choose the appropriate L4T package for your Jetson AGX Xavier. In this example, L4T r32.1.0 is chosen to be flashed on a Jetson AGX Xavier.
 2. Once you download your board support package, copy the downloaded CTI BSP into the ‘Linux_for_Tegra’ directory as shown in the terminal screenshot.
cp /Downloads/CTI-L4t-V203.tgz nvidia/nvidia_sdk/JetPack_4.2_Linux_P2888/Linux_for_Tegra/
cd nvidia/nvidia_sdk/JetPack_4.2_Linux_P2888/Linux_for_Tegra/
3. Afterwards, extract the .tgz file to unload the CTI product profiles for flashing. Log in as root user using ‘sudo’ where you will be asked the the password for Ubuntu and run the install script to automatically install the board support package files to the correct locations on the host system.
tar -xzf CTI-L4T-V203.tgz
cd CTI-L4T
sudo install.sh
4. Before installing the board support package, please read the included readme.txt. To switch between different products, the module will need to be re-flashed. Supported CTI product profiles will be listed when running the install.sh file. Once done, change back into the ‘Linux_for_Tegra’ directory . Now you can flash your Xavier using the NVIDIA Development kit or CTI carrier.
5. Hold the recover button on the NVIDIA Development kit or CTI carrier, then press the power button. Connect a USB OTG cable from the NVIDIA Development kit or CTI carrier to the host computer. Type ‘lsusb’ to confirm the device is in recovery.

6. You may run an automatic flash script called the cti-flash.sh
./cti-flash.sh
Or you may manually flash the module with the correct profile for your your CTI carrier.
The profiles end with ‘.conf’. when flashing the board do not type the ‘.conf’ extension.
./flash.sh <CTI Carrier profile> mmcblk0p1
Here is a Table illustrating the different CTI Carrier profiles that can be flashed on the AGX Xavier.
| Sentry-X | Rogue | Mimic | |
|---|---|---|---|
| Xavier | sentry-dp sentry-hdmi | rogue rogue-gmsl rogue-imx274-2cam | mimic-base mimic-spacely-base |
7. Once you read the flash is successful prompt, the power can be cycled and the Jetson AGX Xavier can be booted from its internal memory.
If flashed correctly, you should receive an output stating:
*** The target t186ref has been flashed successfully. ***
L4T r32.1.1
The CTI-L4T BSP forXavier modules must be installed on your x86 Ubuntu 16.04 host system that has Jetpack installed. See the table in our release notes here for supported versions.
Copy the CTI-L4T-V2##.tgz package into:
<install_dir>/Xavier/Linux_for_Tegra/
Change to the Linux_for_Tegra_tx2 directory:
cd <install_dir>/Xavier/Linux_for_Tegra/
Extract the BSP:
tar -xzf CTI-L4T-V2XX.tgz
Run the install script (as root or sudo) to automatically install the BSP files to the correct locations on the host system:
sudo ./install.sh
Change back to the Linux_for_Tegra directory:
cd ..
Now you can flash a Xavier using the NVIDIA Development Kit or CTI carrier.
CTI Assisted Flashing
./cti-flash.sh
Manual Flashing
./flash.sh <profile> mmcblk0p1
Xavier Examples:
./flash.sh rogue mmcblk0p1
./flash.sh mimic-base mmcblk0p1
./flash.sh rogue-imx274-2cam  mmcblk0p1
TX2i
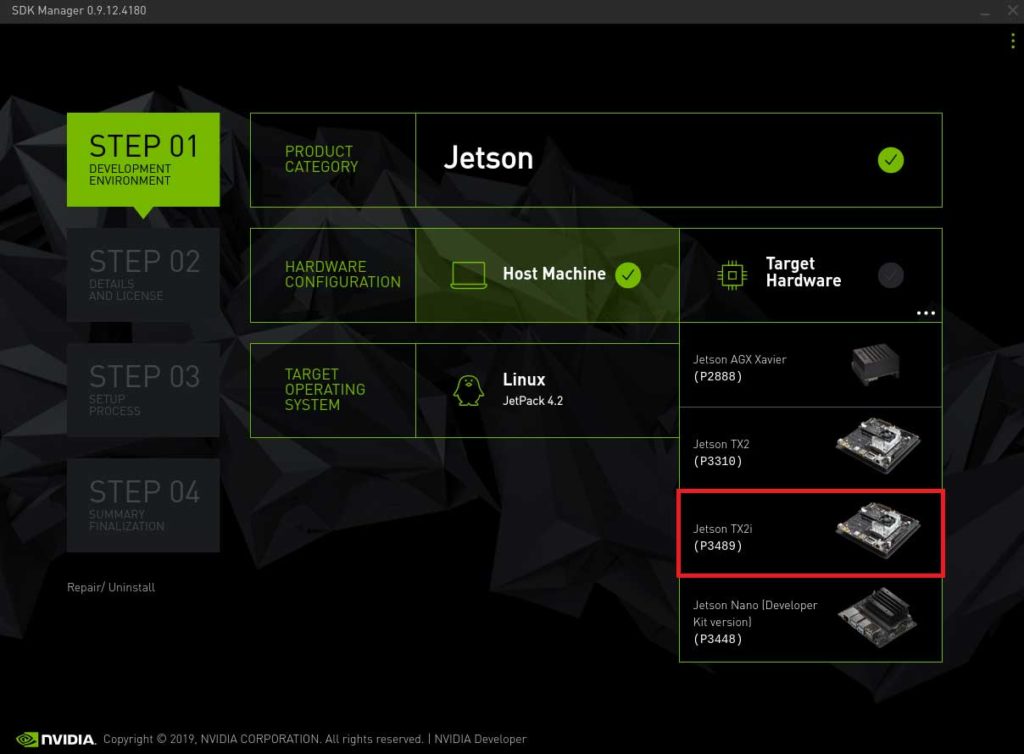
1. Open Nvidia SDK Manager. For first time use, you must log in to your Nvidia Developer account.

2. Choose your target Operating System to be JetPack 4.2.1

3. Choose your target hardware to be the Jetson TX2i

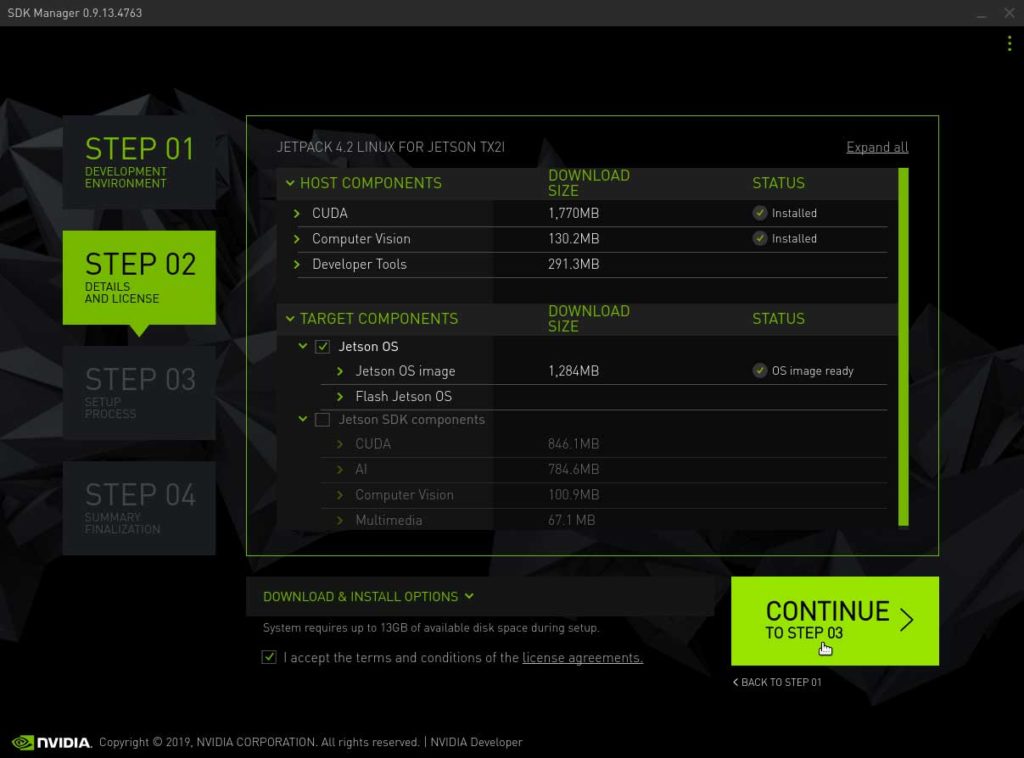
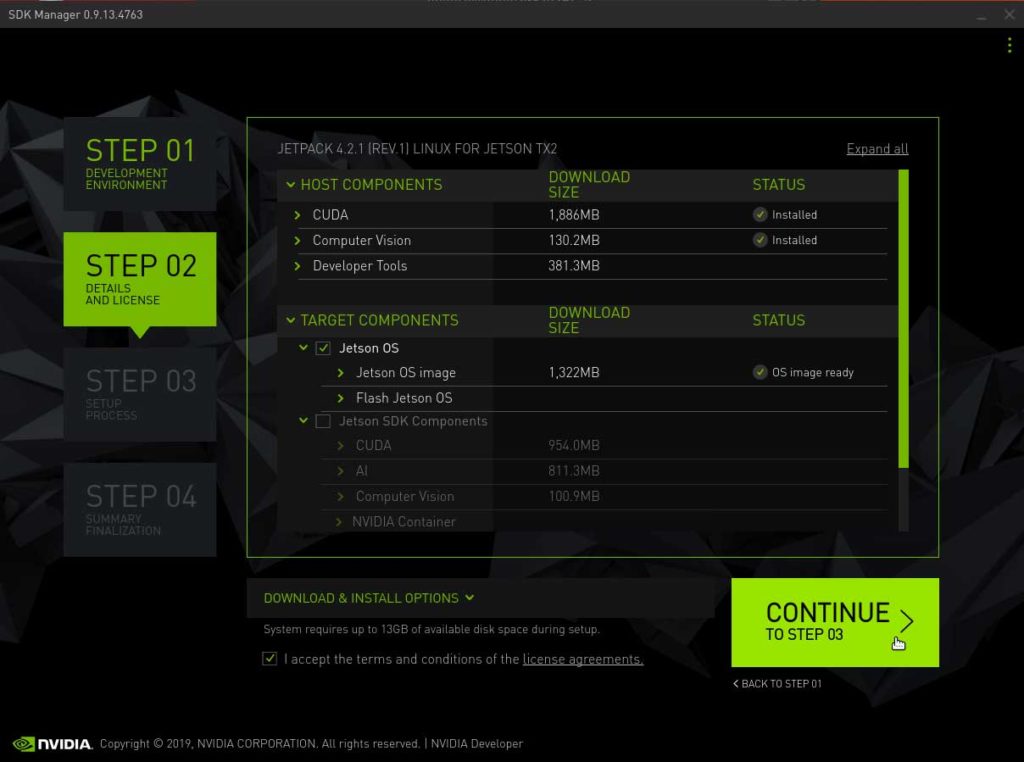
4. You may uncheck the box for SDK components if you do not need CUDA applications etc. Accept the terms and continue to STEP 03.

5. Enter your password to perform administrative tasks.

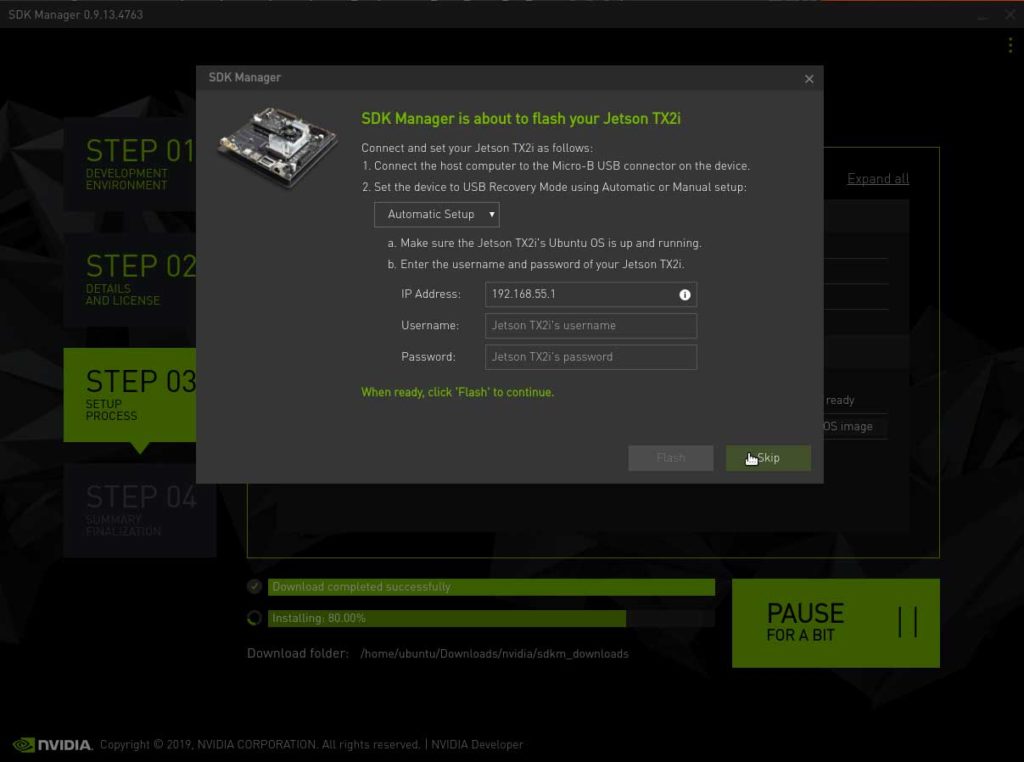
6. Click to Skip flashing the Jetson TX2i with the SDK Manager, as this is done at a later time.
7. Once the setup process from STEP 03 is finished, review the summary finalization in STEP 04 and click ‘FINISH AND EXIT’.

L4T r32.2.0
The CTI-L4T Board Support Package adds support for Connect Tech NVIDIA® Jetson™ Xavier and TX2i/TX2/TX1 carrier boards to Linux4Tegra. It includes any extra files required to use all the features of the carriers. You can click here to download the L4T Board Support Packages from our website. We provide board support packages for your AGX Xavier solutions and TX2i/ TX2/ TX1 solutions.
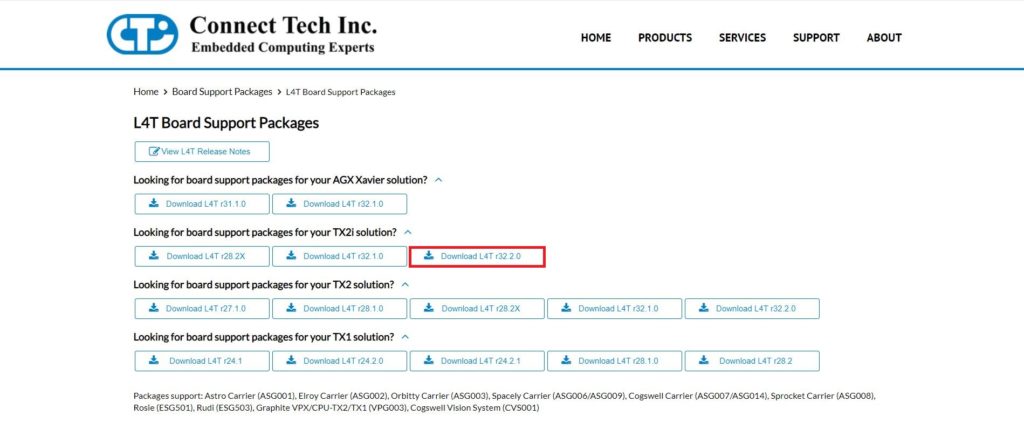
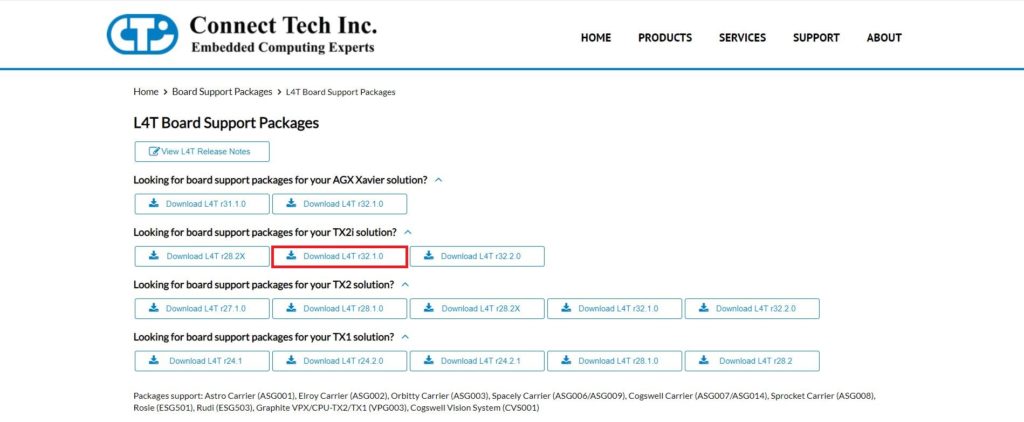
1. Click to download the Board Support Package and choose the appropriate L4T package for your Jetson TX2i.
 2. Once you download your board support package, copy the downloaded CTI BSP into the ‘Linux_for_Tegra’ directory as shown in the terminal screenshot.
cp Downloads/CTI-L4t-V126.tgz ~/nvidia/nvidia_sdk/JetPack_4.2.1_Linux_GA_P3489/Linux_for_Tegra/
cd nvidia/nvidia_sdk/JetPack_4.2.1_Linux_GA_P3489/Linux_for_Tegra/
3. Afterwards, extract the .tgz file to unload the CTI product profiles for flashing. Log in as root user using ‘sudo’ where you will be asked the the password for Ubuntu and run the install script to automatically install the board support package files to the correct locations on the host system.
tar -xzf CTI-L4T-V126.tgz
cd CTI-L4T
sudo install.sh
4. Before installing the board support package, please read the included readme.txt. To switch between different products, the TX2 will need to be re-flashed. Supported CTI product profiles will be listed when running the install.sh file. Once done, change back into the ‘Linux_for_Tegra’ directory . Now you can flash a TX2i using the NVIDIA Development kit or CTI carrier.
cd ..
5. Hold the recover button on the NVIDIA Development kit or CTI carrier, then press the power button. Connect a USB OTG cable from the NVIDIA Development kit or CTI carrier to the host computer. Type ‘lsusb’ to confirm the device is in recovery.
6. You may run an automatic flash script called the cti-flash.sh
./cti-flash.sh
Or you may manually flash the module with the correct profile for your your CTI carrier.
The profiles end with ‘.conf’. when flashing the board do not type the ‘.conf’ extension.
./flash.sh cti/tx2i/<CTI Carrier profile> mmcblk0p1
Here is a Table illustrating the different CTI Carrier profiles that can be flashed on the Jetson TX2i.
| Astro | Elroy | Orbitty | Spacely | Cogswell | Sprocket | Rudi | Rosie | Quasar | Graphite VPX | |
|---|---|---|---|---|---|---|---|---|---|---|
| TX2i | astro-revG+ astro-mpcie astro-usb3 *Requires Breakout Board XBG206 Rev F for Jetson TX2i | elroy-revF+ elroy-mpcie elroy-usb3 | orbitty | spacely-base spacely-imx185-3cam spacely-imx185-6cam spacely-imx274-3cam spacely-imx274-6cam | cogswell | sprocket sprocket-imx185 sprocket-imx274 | rudi rudi-mpcie rudi-usb3 | rosie | quasar quasar-imx185 quasar-imx274 | vpg003 vpg003-imx185-3cam vpg003-imx274-3cam |
7. Once you read the flash is successful prompt, the power can be cycled and the Jetson TX2i can be booted from its internal memory.
If flashed correctly, you should receive an output stating:
*** The target t186ref has been flashed successfully. ***
1. Open Nvidia SDK Manager. For first time use, you must log in to your Nvidia Developer account.

2. At STEP 01, change the target operating system to JetPack 4.2

3. Choose your target hardware to be the TX2i
4. You may uncheck the box for SDK components if you do not need CUDA applications etc. Accept the terms and continue to STEP 03.
5. Enter your password to perform administrative tasks.

6. Click to Skip flashing the Jetson TX2i with the SDK Manager, as this is done at a later time.
7. Once the setup process from STEP 03 is finished, review the summary finalization in STEP 04 and click ‘FINISH AND EXIT’.
L4T r32.1.0
The CTI-L4T Board Support Package adds support for Connect Tech NVIDIA® Jetson™ Xavier/TX2/TX1 carrier boards to Linux4Tegra. It includes any extra files required to use all the features of the carriers. You can click here to download the L4T Board Support Packages from our website. We provide board support packages for your AGX Xavier solutions and TX2i/ TX2/ TX1 solutions.
1. Click to download the Board Support Package and choose the appropriate L4T package for your NVIDIA Jetson TX2i. In this example, L4T r32.1.0 is chosen to be flashed on a TX2i module.
2. Once you download your board support package, copy the downloaded CTI BSP into the ‘Linux_for_Tegra’ directory as shown in the terminal screenshot.
cp Downloads/CTI-L4t-V125.tgz ~/nvidia/nvidia_sdk/Jetpack_4.2_Linux_P3489/Linux_for_Tegra
cd /nvidia/nvidia_sdk/Jetpack_4.2_Linux_P3489/Linux_for_Tegra
3. Afterwards, extract the .tgz file to unload the CTI product profiles for flashing. Log in as root user using ‘sudo’ where you will be asked the the password for Ubuntu and run the install script to automatically install the board support package files to the correct locations on the host system.
tar -xzf CTI-L4T-V125.tgz
cd CTI-L4T
sudo install.sh
4. Before installing the board support package, please read the included readme.txt. To switch between different products, the TX2 will need to be re-flashed. Supported CTI product profiles will be listed when running the install.sh file. Once done, change back into the ‘Linux_for_Tegra’ directory . Now you can flash a TX2i using the NVIDIA Development kit or CTI carrier.
cd ..
5. Hold the recover button on the NVIDIA Development kit or CTI carrier, then press the power button. Connect a USB OTG cable from the NVIDIA Development kit or CTI carrier to the host computer. Type ‘lsusb’ to confirm the device is in recovery.
6. You may run an automatic flash script called the cti-flash.sh
./cti-flash.sh
Or you may manually flash the module with the correct profile for your your CTI carrier.
The profiles end with ‘.conf’. when flashing the board do not type the ‘.conf’ extension.
./flash.sh <CTI Carrier profile> mmcblk0p1
Here is a Table illustrating the different CTI Carrier profiles that can be flashed on the Jetson TX2i.
| Astro | Elroy | Orbitty | Spacely | Cogswell | Sprocket | |
|---|---|---|---|---|---|---|
| TX2i | astro-revG+-tx2i astro-mpcie-tx2i astro-usb3-tx2i *Requires Breakout Board XBG206 Rev F for Jetson TX2i | elroy-revF+-tx2i elroy-mpcie-tx2i elroy-usb3-tx2i | orbitty-tx2i | spacely-base-tx2i spacely-imx185-3cam-tx2i spacely-imx185-6cam-tx2i spacely-imx274-3cam-tx2i spacely-imx274-6cam-tx2i | cogswell-tx2i | sprocket-tx2i sprocket-imx185-tx2i sprocket-imx274-tx2i |
7. Once you read the flash is successful prompt, the power can be cycled and the TX2i can be booted from its internal memory.
L4T r28.2.X
The CTI-L4T BSP for TX2/TX2i modules must be installed on your x86 Ubuntu 14.04/16.04 host system that has Jetpack installed. See the table in our release notes here for supported versions.
Copy the CTI-L4T-V1##.tgz package into:
<install_dir>/64_TX2/Linux_for_Tegra/
Change to the Linux_for_Tegra_tx2 directory:
cd <install_dir>/64_TX2/Linux_for_Tegra/
Extract the BSP:
tar -xzf CTI-L4T-V1XX.tgz
Run the install script (as root or sudo) to automatically install the BSP files to the correct locations on the host system:
sudo ./install.sh
Change back to the Linux_for_Tegra directory:
cd ..
Now you can flash a TX2 using the NVIDIA Development Kit or CTI carrier.
CTI Assisted Flashing
./cti-flash.sh
Manual Flashing
./flash.sh <profile> mmcblk0p1
Examples:
./flash.sh astro-usb3-tx2i mmcblk0p1

./flash.sh astro-mpcie-tx2i mmcblk0p1

./flash.sh spacely-imx274-3cam-tx2i mmcblk0p1
Currently there are multiple different profiles (.conf files) for some boards as there are some hardware incompatibilities with the TX2 modules on certain revisions of carriers that were originally designed for the TX1. See this KDB for more detailed information.
TX2
1. Open Nvidia SDK Manager. For first time use, you must log in to your Nvidia Developer account.

2. Choose your target Operating System to be JetPack 4.2.1

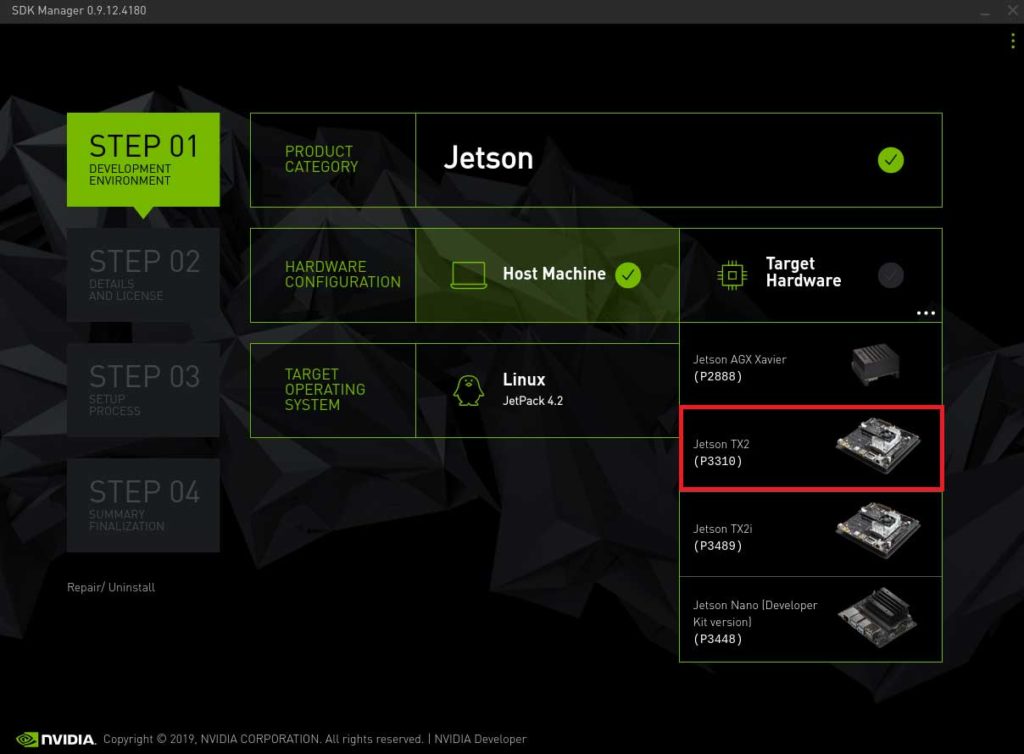
3. Choose your target hardware to be the Jetson TX2
4. You may uncheck the box for SDK components if you do not need CUDA applications etc. Accept the terms and continue to STEP 03.
5. Enter your password to perform administrative tasks.
6. Click to Skip flashing the Jetson TX2 with the SDK Manager, as this is done at a later time.
7. Once the setup process from STEP 03 is finished, review the summary finalization in STEP 04 and click ‘FINISH AND EXIT’.

L4T r32.2.0
The CTI-L4T Board Support Package adds support for Connect Tech NVIDIA® Jetson™ Xavier and TX2i/TX2/TX1 carrier boards to Linux4Tegra. It includes any extra files required to use all the features of the carriers. You can click here to download the L4T Board Support Packages from our website. We provide board support packages for your AGX Xavier solutions and TX2i/ TX2/ TX1 solutions.
1. Click to download the Board Support Package and choose the appropriate L4T package for your Jetson TX2.
2. Once you download your board support package, copy the downloaded CTI BSP into the ‘Linux_for_Tegra’ directory as shown in the terminal screenshot.
cp Downloads/CTI-L4t-V126.tgz ~/nvidia/nvidia_sdk/Jetpack_4.2.1_Linux_GA_P3310/Linux_for_Tegra
cd /nvidia/nvidia_sdk/Jetpack_4.2.1_Linux_GA_P3310/Linux_for_Tegra
3. Afterwards, extract the .tgz file to unload the CTI product profiles for flashing. Log in as root user using ‘sudo’ where you will be asked the the password for Ubuntu and run the install script to automatically install the board support package files to the correct locations on the host system.
tar -xzf CTI-L4T-V126.tgz
cd CTI-L4T
sudo install.sh
4. Before installing the board support package, please read the included readme.txt. To switch between different products, the TX2 will need to be re-flashed. Supported CTI product profiles will be listed when running the install.sh file. Once done, change back into the ‘Linux_for_Tegra’ directory . Now you can flash a TX2 using the NVIDIA Development kit or CTI carrier.
cd ..
5. Hold the recover button on the NVIDIA Development kit or CTI carrier, then press the power button. Connect a USB OTG cable from the NVIDIA Development kit or CTI carrier to the host computer. Type ‘lsusb’ to confirm the device is in recovery.
6. You may run an automatic flash script called the cti-flash.sh
./cti-flash.sh
Or you may manually flash the module with the correct profile for your your CTI carrier.
The profiles end with ‘.conf’. when flashing the board do not type the ‘.conf’ extension.
./flash.sh cti/tx2/<CTI Carrier Profile> mmcblk0p1
Here is a Table illustrating the different CTI Carrier profiles that can be flashed on the Jetson TX2.
| Astro | Elroy | Orbitty | Spacely | Cogswell | Sprocket | Rudi | Rosie | Quasar | Graphite VXG | |
|---|---|---|---|---|---|---|---|---|---|---|
| TX2 | astro-revG+ astro-mpcie astro-usb3 *Requires Breakout Board XBG201 Rev F for Jetson TX1/TX2 | elroy-revF+ elroy-mpcie elroy-usb3 | orbitty | spacely-base spacely-imx185-3cam spacely-imx185-6cam spacely-imx274-3cam spacely-imx274-6cam | cogswell | sprocket sprocket-imx185 sprocket-imx274 | rudi rudi-mpcie rudi-usb3 | rosie | quasar quasar-imx185 quasar-imx274 | vxg003 vxg003-imx185-3cam vxg003-imx274-3cam |
7. Once you read the flash is successful prompt, the power can be cycled and the Jetson TX2 can be booted from its internal memory.
If flashed correctly, you should receive an output stating:
*** The target t186ref has been flashed successfully. ***
1. Open Nvidia SDK Manager. For first time use, you must log in to your Nvidia Developer account.
2. At STEP 01, change the target operating system to JetPack 4.2
3. Choose your target hardware to be the TX2

4. You may uncheck the box for SDK components if you do not need CUDA applications etc. Accept the terms and continue to STEP 03.
5. Enter your password to perform administrative tasks.

6. Click to Skip flashing the Jetson TX2 with the SDK Manager, as this is done at a later time.

7. Once the setup process from STEP 03 is finished, review the summary finalization in STEP 04 and click ‘FINISH AND EXIT’.

L4T r32.1.0
The CTI-L4T Board Support Package adds support for Connect Tech NVIDIA® Jetson™ Xavier/TX2/TX1 carrier boards to Linux4Tegra. It includes any extra files required to use all the features of the carriers. You can click here to download the L4T Board Support Packages from our website. We provide board support packages for your AGX Xavier solutions and TX2i/ TX2/ TX1 solutions.
1. Click to download the Board Support Package and choose the appropriate L4T package for your NVIDIA Jetson TX2. In this example, L4T r32.1.0 is chosen to be flashed on a TX2 module.
2. Once you download your board support package, copy the downloaded CTI BSP into the ‘Linux_for_Tegra’ directory as shown in the terminal screenshot.
cp Downloads/CTI-L4t-V125.tgz ~/nvidia/nvidia_sdk/Jetpack_4.2_Linux_P3310/Linux_for_Tegra
cp nvidia/nvidia_sdk/Jetpack_4.2_Linux_P3310/Linux_for_Tegra
3. Afterwards, extract the .tgz file to unload the CTI product profiles for flashing. Log in as root user using ‘sudo’ where you will be asked the the password for Ubuntu and run the install script to automatically install the board support package files to the correct locations on the host system.
tar -xzf CTI-L4T-V125.tgz
cd CTI-L4T
sudo install.sh
4. Before installing the board support package, please read the included readme.txt. To switch between different products, the TX2 will need to be re-flashed. Supported CTI product profiles will be listed when running the install.sh file. Once done, change back into the ‘Linux_for_Tegra’ directory . Now you can flash a TX2 using the NVIDIA Development kit or CTI carrier.
cd ..
5. Hold the recover button on the NVIDIA Development kit or CTI carrier, then press the power button. Connect a USB OTG cable from the NVIDIA Development kit or CTI carrier to the host computer. Type ‘lsusb’ to confirm the device is in recovery.
6. You may run an automatic flash script called the cti-flash.sh
./cti-flash.sh
Or you may manually flash the module with the correct profile for your your CTI carrier.
The profiles end with ‘.conf’. when flashing the board do not type the ‘.conf’ extension.
./flash.sh <CTI Carrier Profile> mmcblk0p1
Here is a Table illustrating the different CTI Carrier profiles that can be flashed on the Jetson TX2.
| Astro | Elroy | Orbitty | Spacely | Cogswell | Sprocket | Rudi | Rosie | Quasar | Graphite VXG | |
|---|---|---|---|---|---|---|---|---|---|---|
| TX2 | astro-revG+ astro-mpcie astro-usb3 *Requires Breakout Board XBG201 Rev F for Jetson TX1/TX2 | elroy-revF+ elroy-mpcie elroy-usb3 | orbitty | spacely-base spacely-imx185-3cam spacely-imx185-6cam spacely-imx274-3cam spacely-imx274-6cam | cogswell | sprocket sprocket-imx185 sprocket-imx274 | rudi rudi-mpcie rudi-usb3 | rosie | quasar quasar-imx185 quasar-imx274 | vxg003 vxg003-imx185-3cam vxg003-imx274-3cam |
7. Once you read the flash is successful prompt, the power can be cycled and the Jetson TX2 can be booted from its internal memory.
If flashed correctly, you should receive an output stating:
*** The target t186ref has been flashed successfully. ***
L4T r28.2.X
The CTI-L4T BSP for TX2/TX2i modules must be installed on your x86 Ubuntu 14.04/16.04 host system that has Jetpack installed. See the table in our release notes here for supported versions.
Copy the CTI-L4T-V1##.tgz package into:
<install_dir>/64_TX2/Linux_for_Tegra/
Change to the Linux_for_Tegra_tx2 directory:
cd <install_dir>/64_TX2/Linux_for_Tegra/
Extract the BSP:
tar -xzf CTI-L4T-V1XX.tgz
Run the install script (as root or sudo) to automatically install the BSP files to the correct locations on the host system:
sudo ./install.sh
Change back to the Linux_for_Tegra directory:
cd ..
Now you can flash a TX2 using the NVIDIA Development Kit or CTI carrier.
CTI Assisted Flashing
./cti-flash.sh
Manual Flashing
./flash.sh <profile> mmcblk0p1
Examples:
./flash.sh astro-usb3 mmcblk0p1

./flash.sh astro-mpcie mmcblk0p1

./flash.sh spacely-imx274-3cam mmcblk0p1
Currently there are multiple different profiles (.conf files) for some boards as there are some hardware incompatibilities with the TX2 modules on certain revisions of carriers that were originally designed for the TX1. See this KDB for more detailed information.
L4T r28.1.0 & prior
The CTI-L4T BSP for TX2 modules must be installed on your x86 Ubuntu 14.04 or 16.04 host system that has Jetpack installed. See the table in our release notes here for supported versions.
Copy the CTI-L4T-V1##.tgz package into:
<install_dir>/64_TX2/Linux_for_Tegra_tx2/
Change to the Linux_for_Tegra_tx2 directory:
cd <install_dir>/64_TX2/Linux_for_Tegra_tx2/
Extract the BSP:
tar -xzf CTI-L4T-V1XX.tgz
Run the install script (as root or sudo) to automatically install the BSP files to the correct locations on the host system:
sudo ./install.sh
Change back to the Linux_for_Tegra_tx2 directory:
cd ..
Now you can flash a TX2 using the NVIDIA Development Kit or CTI carrier.
./flash.sh <profile> mmcblk0p1
Examples:
./flash.sh astro-revG+ mmcblk0p1

./flash.sh elroy-revF+ mmcblk0p1

./flash.sh orbitty mmcblk0p1
Currently there are multiple different profiles (.conf files) for some boards as there are some hardware incompatibilities with the TX2 modules on certain revisions of carriers that were originally designed for the TX1. See this KDB for more detailed information.
TX1
L4T r28.2.0
The CTI-L4T BSP for TX1 modules must be installed on your x86 Ubuntu 14.04/16.04 host system that has Jetpack installed. See the table in our release notes here for supported versions.
Copy the CTI-L4T-V0##.tgz package into:
<install_dir>/64_TX1/Linux_for_Tegra/
Change to the Linux_for_Tegra directory:
cd <install_dir>/64_TX1/Linux_for_Tegra/
Extract the BSP:
tar -xzf CTI-L4T-V0XX.tgz
Run the install script (as root or sudo) to automatically install the BSP files to the correct locations on the host system:
sudo ./install.sh
Change back to the Linux_for_Tegra directory:
cd ..
Now you can flash a TX1 using the NVIDIA Development Kit or CTI carrier.
CTI Assisted Flashing
./cti-flash.sh
Manual Flashing
./flash.sh <profile> mmcblk0p1
Examples:
./flash.sh spacely-IMX274-3CAM mmcblk0p1

./flash.sh astro mmcblk0p1

./flash.sh elroy mmcblk0p1
Currently there are multiple different profiles (.conf files) for some boards as there are some hardware incompatibilities with the TX2 modules on certain revisions of carriers that were originally designed for the TX1. See this KDB for more detailed information.
L4T r28.1.0
The CTI-L4T BSP for TX1 modules must be installed on your x86 Ubuntu 14.04 host system that has Jetpack installed. See the table in our release notes here for supported versions.
Copy the CTI-L4T-V0##.tgz package into:
<install_dir>/64_TX1/Linux_for_Tegra_tx1/
Change to the Linux_for_Tegra_tx2 directory:
cd <install_dir>/64_TX1/Linux_for_Tegra_tx1/
Extract the BSP:
tar -xzf CTI-L4T-V0XX.tgz
Run the install script (as root or sudo) to automatically install the BSP files to the correct locations on the host system:
sudo ./install.sh
Change back to the Linux_for_Tegra_tx1 directory:
cd ..
Now you can flash a TX1 using the NVIDIA Development Kit or CTI carrier.
./flash.sh <profile> mmcblk0p1
Examples:
./flash.sh spacely-IMX274-3CAM mmcblk0p1

./flash.sh elroy mmcblk0p1

./flash.sh orbitty mmcblk0p1
Currently there are multiple different profiles (.conf files) for some boards as there are some hardware incompatibilities with the TX2 modules on certain revisions of carriers that were originally designed for the TX1. See this KDB for more detailed information.
L4T r24.2.1 & prior
The CTI-L4T BSP for TX1 modules can be installed directly on the TX1.
Use the NVIDIA Jetpack to flash your TX1 with the stock L4T image.
Copy the downloaded BSP (CTI-L4T-V0XX.tgz) to any directory on your TX1 after flashing.
Extract the BSP:
tar -xzf CTI-L4T-V0XX.tgz
Change to the CTI-L4T directory:
cd CTI-L4T
Run the install script (as root or sudo) to automatically install the BSP files to the correct locations:
sudo ./install.sh [full|minimal] [profile]
The minimal install only installs the Device Trees, CTI’s L4T utility (cti-l4t-util) and all needed config files to /etc/cti/. Choose this if you would prefer to use your own kernel. Note that some board features may not work with only the minimal install. These features are noted with (full) in the “Product Specific Details” section.
The full install includes all of the minimal install as well as the CTI optimized kernel Images. This is the recommended install for ensuring compatibility and it includes numerous bug fixes.
See the cti-l4t-util section for more information about profiles.
Restart the system so the changes will take effect.
sudo reboot
cti-l4t-util
The CTI-L4T BSP package allows you to switch between different CTI products through the use of “profiles”. The cti-l4t-util is the easiest way to switch between boards and to see what profile you have currently enabled. Every board will boot with any profile but may have a limited feature set. Switching between boards does not require a re-install of the BSP.
Features
- Changing the CTI board profile
- Printing version info
Examples
Here are some examples using the cti-l4t-util
List all available profiles installed:
cti-l4t-util profile -l
Changes your profile to astro, note the profile name is case sensitive:
cti-l4t-util profile -c astro
Print the cti-l4t-util help:
cti-l4t-util -h
Print help related to the profile command:
cti-l4t-util profile -h
Print CTI-L4T BSP version installed:
cti-l4t-util version
Updated November 13th, 2019